Slow set wall & floor tile adhesive professional


| Extra flexible for use on heated and plywood floors | |
| Slow setting for longer working time | |
| Extra strong bond |
About this product
A flexible, cement-based floor and wall tile adhesive. For fixing ceramic, porcelain, mosaic, quarry, marble, terrazzo, natural stone, brick slips and glass-blocks to most building substrates. Suitable for interior and exterior walls and floors, including swimming pools.
It is particularly suited for situations where some movement, deflection or limited shrinkage is likely.
Features and benefits
- Manufactured under BSI Quality Assurance Scheme ISO 9001
- Gives improved adhesion for fully vitrified tiles
- Suitable for use in dry and wet conditions
- Ideal for tiling on to low porosity substrates
- Particularly suitable for situations where some movement or vibration is likely or when tiles are very large
- Longer working time for difficult layouts
- Available in white
Uses
For fixing ceramic, porcelain and natural stone tiles:
- Walls and floors
- Interior and exterior
- Underfloor heating
- Undertile warming
- Overboarded wooden floors
- Low porosity tiles or substrates
- Power floated screeds
- Tiling onto existing tiles
- Swimming pools
Constraints
Not recommended for tiling onto single layer wooden floors, e.g. chipboard, tongued and grooved timber.
Not recommended for tiles with resin backs.
Technical Data
Exceeds the requirements of BS EN 12004 for C2-S1
| Bed thickness | 3 – 6mm |
| Coverage (approx.) | 9 kg/m2 (solid bed, 6 mm thick) 4.5 kg/m2 (solid bed, 3 mm thick) |
| Open time | 20 minutes |
| Working time | 1 hour pot life after mixing |
| Set time | 24 hours – light foot traffic, full load after 48 hours |
| Temperature resistance | –10˚C to 100˚C and frost resistant when set |
| Water addition | 4 litres per 20 kg for normal floor tiling |
Note: setting times are quoted at 20˚C and are temperature and humidity dependent
Preparation
Ensure that all surfaces are clean, dry, sound and free from dust, grease or any contaminating barrier. Make good any unsound areas and remove flaky or peeling layers before tiling. Prime porous or dusty surfaces with Weber Tiling Primer.
Check before use that the colour of the adhesive does not cause staining or discolouration of light coloured or translucent tiles.
Mixing
Gradually add approximately 3.5 parts of powder to 1 part of clean water (measured by volume), and mix to a smooth, workable, stiff paste. Normal usage requires 4 litres of water per 20 kg adhesive.
Use within 60 minutes of mixing.
Do not attempt to extend the pot life by adding more water to the mix.
Application
Do not use at temperatures below 5°C.
Apply the adhesive onto the substrate covering up to 1 m2 at a time (or no more than can be tiled within 20 minutes). Use a suitable notched trowel to achieve a bed thickness of 3 to 6 mm. Large or studded backed tiles may need to have adhesive buttered onto the tile back as well.
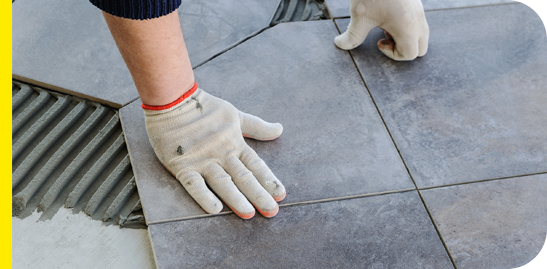
Bed the tiles firmly into the adhesive with a slight sliding and/or twisting action, to ensure a good contact.
It is good practice to lift an occasional tile after fixing, to verify that the required contact is being achieved.
In wet areas, external areas and all floors, the final adhesive bed should be free from voids. Leave appropriate clearance joints for grouting and make any adjustment within 10 minutes.
Carefully clean off any excess adhesive from the tiles and joints with a damp sponge or cloth before it sets.
Leave for at least 24 hours before grouting. Longer is required at lower temperatures or when tiling onto impervious or sealed surfaces. For swimming pools, leave at least 3 days before grouting and then a further 3 weeks before filling.
Brick and blockwork
Allow at least 6 weeks before tiling. Lightweight blocks need priming. Ensure that the wall face is sufficiently flat.
Cement/sand render or screed
Allow at least 3 weeks for screed and 2 weeks for render before tiling. Priming may be required if the surface is very dusty or porous.
Concrete
Allow at least 7 weeks before tiling onto new concrete. Surface should be clean and free from laitance – scabbling is recommended. Set time will be extended on dense or power floated screeds.
Existing ceramic/vinyl tiles
Ensure that the substrate is strong enough to take the weight of extra tiling, that the existing tiles are firmly adhered and that the surface is free from any wax or polish. Set time will be extended.
Plaster walls and anhydrite screeds
Leave plaster for at least 4 weeks before tiling. Ensure anhydrite screeds are fully dry (moisture content <0.5%). It is important that the surface is abraided and sealed by repeatedly coating with Weber Tiling Primer until the surface stops absorbing.
Underfloor heating/undertile warming
The heating must be off and should be turned on gradually at least 5 days after tiling.
For electric undertile warming systems a 10-15mm layer of Weber Flexible floor leveller prior to tiling is recommended. The Flexible floor leveller should be set sufficiently to receive tiles after 1-2 hours and will protect electric wires from damage while applying the adhesive.
Wallboards; fibre/cement, plywood, plasterboard, MDF
Ensure boards are rigidly supported, clean, dry and free from dust. Plasterboard should be thoroughly primed with Weber Tiling Primer until the surface stops absorbing. Prime the reverse face and edges of plywood with Weber Tiling Primer before fixing.
Wooden floors
Ensure the floor is rigid and capable of supporting the expected load with minimal deflection. Brace any areas that need extra support with noggins between the joists. New WBP plywood floors should be a minimum of 18 mm thick and all joints must be adequately supported.
Tongued and grooved timber and chipboard must be over-boarded. Existing boards should be screwed down to joists with 2 screws at each end and another 2 wherever they cross joists/noggins. For small floors with no noticeable deflection 9 mm plywood or suitable tile backer board can be used to provide a smooth surface to tile. If there is some limited deflection, a minimum of 15 mm WBP plywood or equivalent tile backer board should be used to increase the rigidity of the floor. If there is still noticeable movement in the floor, another layer of plywood or tile backer board may be needed. New plywood boards should be primed on the reverse face and edges with Weber Tiling Primer and screwed down every 200 – 300 mm. Slight gaps should be left between boards and at the perimeter for expansion. These should be filled with Weber Silicone Sealant.
Allowance for movement
Flexible joints should be incorporated to allow for slight movements due to changes in temperature, humidity etc. as indicated by BS5385:
a)where the tiling meets other materials (e.g. floor perimeters)
b) along all internal corners – vertically and horizontally
c) over existing movement joints or changes in background material
d)dividing large tiled areas into bays (every 3 – 4.5 m on walls, 8 – 10 m on floors)
Packaging
Packed in plastic lined paper sacks. White: 20 kg.
Coverage
Coverage is approximately 1.5 kg of powder per m2 for every 1 mm of bed thickness.
Storage and shelf life
When stored unopened in a cool dry place at temperatures above 5°C, shelf life is 12 months from date of manufacture.
Health and safety
Contains cement (Contains chromium (VI). May produce an allergic reaction). Harmful by inhalation. Irritating to eyes and skin. Keep out of the reach of children. In case of contact with eyes, rinse immediately with plenty of water and seek medical help. After contact with skin, wash immediately with plenty of soap and water. Wear suitable protective clothing, gloves and eye/face protection.
For further information, please request the Material Safety Data Sheet for this product.
Product Selector
Not sure which product you need for your DIY project?
Our easy-to-use product selector can help!

To the best of our knowledge and belief, this information is true and accurate, but as conditions of use and any labour involved are beyond our control, the end user must satisfy himself by prior testing that the product is suitable for his specific application, and no responsibility can be accepted, or any warranty given by our Representatives, Agents or Distributors. Products are sold subject to our Standard Conditions of Sale and the end user should ensure that he has consulted our latest literature.


